Counter-Strike 2

Counter-Strike 2

296 voti
Creating Workshop / Weapon Skins
Da Mcgubbins
The definitive guide for creating your own Workshop Skins!
   
Premio
Aggiungi ai preferiti
Preferito
Rimuovi dai preferiti
Intro

I would appreciate if you could pay your thanks for my time and information by checking out my Rebellion Collection, featured in my guide, and rating it honestly. I'm not in the market to advertise, but I would love you forever!
http://node2.projectplanet.cn/@steamcommunity.com/workshop/filedetails/?id=407290222
Requirements


Unfortunately skinning for CS:GO is not as easy as you would hope, so there is quite a list of software that you will need:


Why Photoshop?
I cannot recommend anything other than Photoshop. Photoshop CS3 or later have the ability to open 3D .obj files, which allow you to preview your skin without exporting it everytime. Photoshop is now only available for a subscription fee via Adobe Creative Cloud. The "Photography" subscription is £9 per month.

However you can use other free alternatives such as Gimp[www.gimp.org] - the downside to this is that you would need to export your texture and import it in to the game EVERYTIME you wanted to preview your skin. This will take a lot of time to do, as you will be making LOTS of adjustments.
Preparation


Ensure that all software in the "Requirements" section is downloaded and installed. We now need to export the texture files from the game, because we need the default texture file to edit, and use as a base for our own skin.

If all you are doing is pasting a camo all over your gun, you can just have a camo texture that's 2048x2048 and not worry about this - but if you do that, it will look pretty darn crappy.

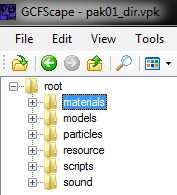
  1. Launch GCFScape
  2. Go to File > Open.
  3. Browse to your steam library, EG: ..\Program Files (x86)\Steam\steamapps\common\Counter-Strike Global Offensive\csgo
  4. Locate the file pak01_dir.vpk
  5. Browse to the following directory: Materials > Models > Weapons > v_Models, through the folder tree on the left:

  6. Right click on the v_models folder and choose Extract.

  7. Save to a folder of your choosing. I suggest keeping all of your CS Skinning files in their own folder somewhere.
  8. Once extracted, you can close GCFScape.
    Note: You have everything you need now, so you can uninstall GCFScape if you wished.
Preparation - Part 2


Which gun?
Decide on what gun you would like to skin. I would recommend simpler guns to start with that don't have too many protruding parts (Pistols, AWP, etc.), as these have less faces to paint, compared to an M4 for example. Note that custom C4, knife, taser, grenade, or arm skins are not currently being accepted by Valve, so skinning these would be a waste of your efforts. Feel free to pick something you are comfortable with skinning. An AK/M4 will take considerably longer to skin than an AWP would, simply because there are so many parts to paint.

Edit the texture Hex values
VTFEdit only knows how to open VTF files with a version of "4", and through a recent update to CS, the versions were changed to "5". Therefore you need to edit the hex value to edit the version number, and in turn, open the file. Unfortunately this is a necessary step, but it's quite simple.

Browse to the V_Models folder that you extracted, and locate the matching folder for the gun of your choosing. In this case, I went for P250 which is in the pist_p250 folder.
  1. Right Click on P250.vtf and choose Open With > Choose Default Program
  2. Browse to C:\Program Files (x86)\HxD and select the .exe launcher in that folder.
  3. Untick Always use the selected program... and ensure that HxD Hex Editor is selected above.

  4. Under row 00000000, column 08, change the entry 05 to 04


  5. Go to File > Save, and then close HxD Hex Editor.

Exporting the texture
Now you need to actually export the texture from VTFEdit so that you can open it in your imaging editting program.

Double click on "P250.vtf", and it should open in VTFEdit. If not, right click the file and choose "Open with", and select VTFEdit manually.

In VTFEdit, with the texture of the gun open, go to File>Export, and save the .TGA texture file to somewhere of your choosing.

Opening the 3D Model and Texture in Photoshop
Remember the "Workbench_Materials" you downloaded at the start of the guide? Open that, and go to the OBJs folder. Open the OBJ file for the gun you are skinning in photoshop.

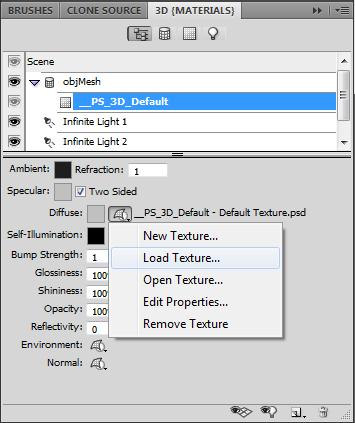
Notice how the gun is solid grey? It hasn't had a texture applied to it yet. Select the _PS_3D_Default layer in the "3D (materials)" window. Then click on the icon next to Diffuse > Load Texture (see below image - later versions of Photoshop may vary!)


Select the .TGA file that you exported in the "Exporting the texture" section.

You should now have the 3D Object open, with the default texture applied to it. Now we can move on to skinning!
Skinning


Finally, the fun part. The part why you came here in the first place!

You can paint directly on to the gun if you want, but, please, don't paint directly on to the gun. It's not very accurate, and the quality is quite poor if you do it this way! Instead, always paint directly on to the texture file itself.

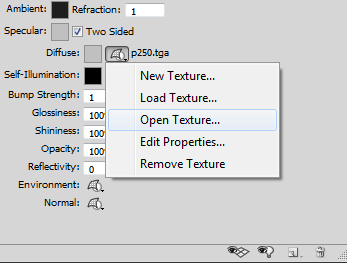
Go ahead and open the texture for the model, by clicking the icon next to Diffuse > Open Texture:


Now you can start painting to your heart's content. Be sure to move back to the 3D Model layer regularly to see how your painting looks on the gun.

Also, make sure you create the skin in "Factory New" quality, as the wearing on the paintwork is done with Alpha Channels. See next chapter for more help with that.
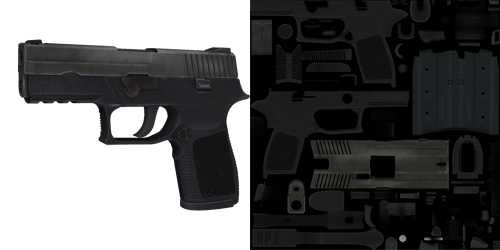
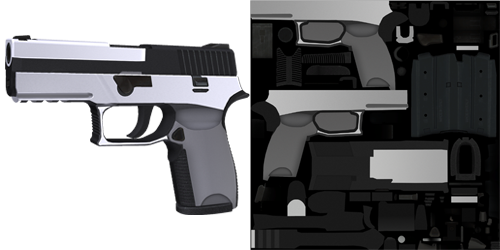
  • This is the default style, which your gun should look like prior to any edits:


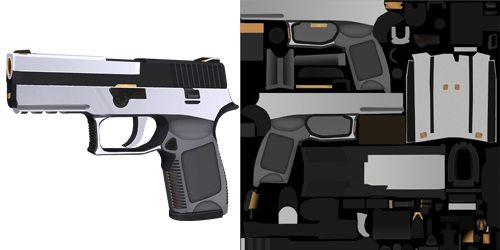
  • I recommend skinning the gun with just basic colours first, so that you can get a feel for how it is going to look at the end of it all. This is just basic colours with no details.


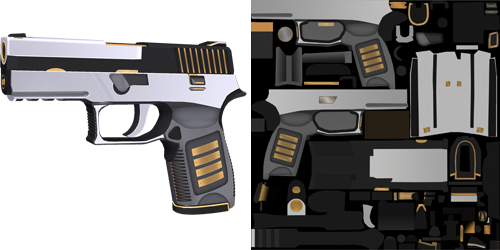
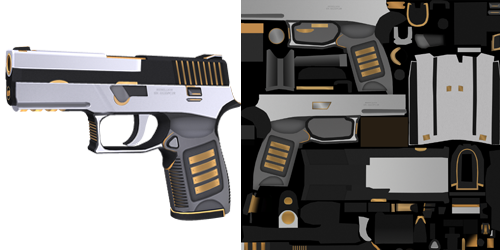
  • Once the colours have been set, you can start adding some more details. Keep going, keep adding more and more, and working on it. Don't forget to save regularly, and always have backups in place to revert to encase you make a mistake.


What is a normal map?
You may have heard of a "Normal Map". This is a file used to create very tiny changes in the 3D Model of the gun. A normal map is applied to the P250 which indents the "SIC SAWER" text on the slider of the gun.

Unfortunately there is no use in creating a normal map for your skin, as we are forced to use Valve's default normal maps. This means that the engraved texts on most guns, and certain textures (IE: the wood grip on the AK47) will forever be in place, regardless of how you create your skin. It's not the end of the world, but we could make some nicer skins if we were able to create our own. Just bear this in mind - don't try to replace the engraved text on your skin, because it would just cause weird overlapping issues.

General Tips
  • It goes without saying, but save both the 3D model and texture reguarly, and keep backups of your files. Photoshop is known to randomly corrupt a file as you are working on it sometimes!
  • If you are unsure what exactly you are painting, try painting it bright red, and then see what changes on the gun. Some of the details are inside the gun itself, and may not be visible on the outside except during a shooting animation, or reloading.
  • Try to use layers as much as possible, so that you aren't painting directly on to the texture itself. It helps later on when we do the Alpha channels, and is also a good way of coming back to refine things, or change their colour.
  • Everything you create must be your own work entirely, or Valve will not consider adding it to the game.
  • Don't be lazy - put effort in to it. My skin used above took 60+ hours from start to finish. If it takes only a few hours, you're either incredibly good, or incredibly sloppy. Pay attention to small details! Don't just grab a camouflage texture and paste it everywhere!
  • Solid colours look plasticy in-game, especially when combined with high phong values (later in the guide). Most surfaces in real life have "grain" and details. Look closey at your desk, your kitchen counter, or your bedroom door - They all have different feels to them. Even adding a little bit of "noise" to the solid colours helps make it look rougher and more natural.
  • I can't tell you how to create a good looking skin. You have to do that yourself. Draw some concept art first if it helps you. It's always a good idea to know what you want before you start it. For me, my style is in the theme of a lightsabre hilt. I just evolved it from there.
Alpha Channels


What is an Alpha Channel?
So you have created a skin now, and it looks awesome. You think you're ready to add the skin to the workshop, but you are mistaken! We now need to finish the different paint work qualities.

You should have created your skin in "Factory New" quality. The wear on the gun is automatically generated by the game itself, however you need to tell the game how and wear to apply the wear. This is done with Alpha Channels.

Here is my Alpha Channel:

  • White areas wear so much that it may not even appear on Factory New.
  • Black areas do not wear at all, even on Battle-scarred.
  • A light grey will be more prone to wear.
  • A dark grey will be less prone to wear.
Therefore as you see above, the alpha channel is just a different combination of light and dark greys. Refining the alpha channel requires importing your skin in to the game's workshop tool, so is quite a time consuming task (see next chapter for details on how to do that).

To create an alpha channel: (In Photoshop)
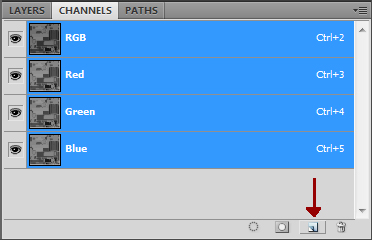
  1. Bottom right corner of photoshop, where the layers are listed, change to the Channels tab.
  2. Click the New Layer icon.

A time saving shortcut
Hopefully you saw my tips about creating layers for each separate area that you painted. To save time creating the alpha channel, you can go back to your layers tab and CTRL+Click on the layer thumbnail. This will make a selection appear on screen. Change back to the Alpha Channel, and then you can use the Fill tool to quickly place a colour down without worrying about going over the edges.

General Tips
  • Some area's have different sensitivities to the grey. The same shade in two different places on the gun can yield different results, so do not assume that "one shade suits all".
  • Having a pure black alpha (aka: no wear) will not help your skin's chances of making it in-game.
  • You always want Factory New to look, well, factory new. It's just a case of balancing the grey to be perfect at all levels. Be careful not to have FN and MM looking identical. There needs to be a noticeable degrade in paintwork quality between FN / MM / FT / WW / BS.
  • There are actually 255 Shades Of Grey.
Previewing In-game


Time to preview your skin in the game! You can do this at any stage during the design process, and if you are unable to preview the 3D skin as you are editting, this would be vital to do from time to time as you are editting your skin.
  1. With the texture file open, go to File > Save As.
  2. Save the file as a Targa (.TGA).
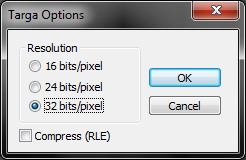
  3. Choose 32-bit when prompted, to ensure highest quality / less file compression.

  4. Open VTFEdit.
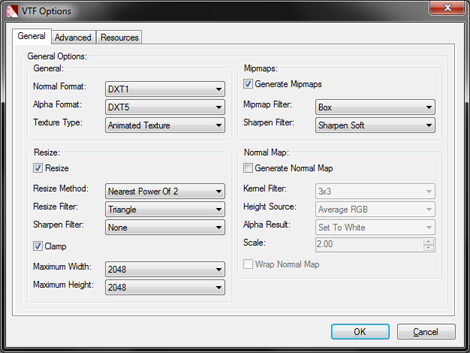
  5. Go to File > Import and then select the TGA file saved in Step 2.
  6. Make sure that the import screen looks the same as this:

  7. Your own texture should now appear in VTFEdit. Go to File > Save as
  8. Save the file as .vtf with any name and location of your choosing.
  9. Launch CS:GO!
  10. Open the console by pressing the tild key (¬ or ~)
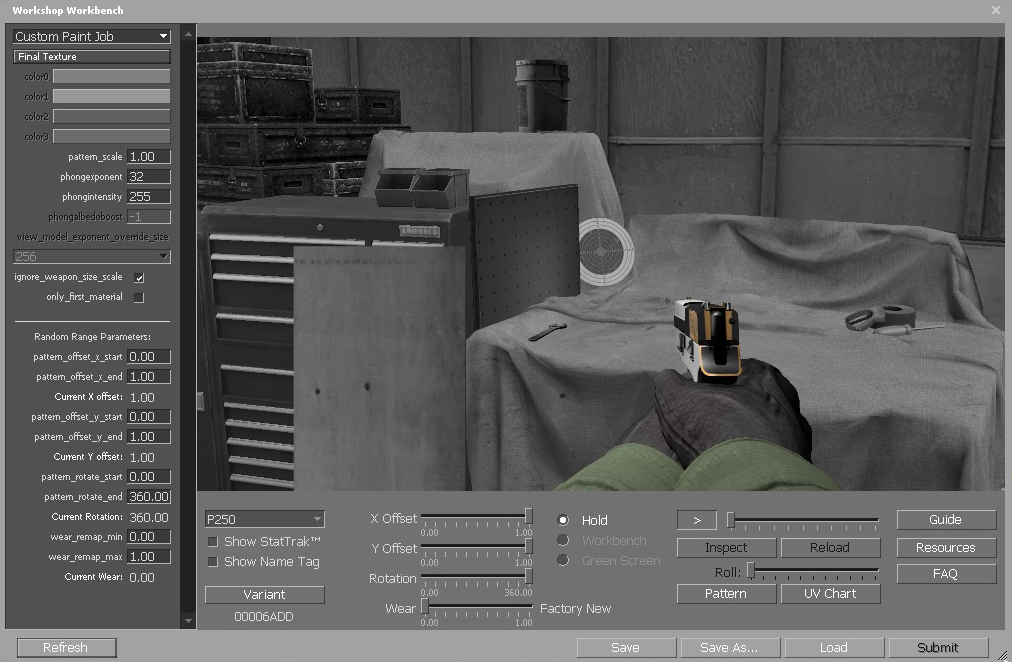
  11. Type in workshop_workbench and press enter.
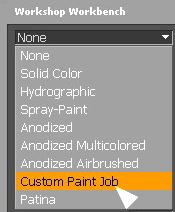
  12. You have a Custom Paint Job, so select this option top left corner:

  13. Select the Choose Pattern option just below, and browse to the VTF file you saved in step 8.
  14. Tick the Ignore_weapon_size_scale option down the left.

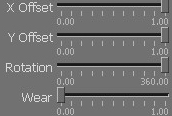
  15. Select your weapon from the drop down at the bottom of the screen, and make sure the sliders are set like this:

  16. If you desire, you can also play around with the Phong values (shininess) with these options:

  17. Once you are happy with everything and ready to submit to workshop, click "Save as" and save the workbench.txt file to a location of your choosing.


Submitting To The Workshop


  1. Go through the usual steps to preview your skin in-game, as per Step 17 in the previous chapter. Make sure you have the Workbench.txt file.
  2. Launch CS:GO.
  3. Open the console by pressing the Tild key (¬ or ~).
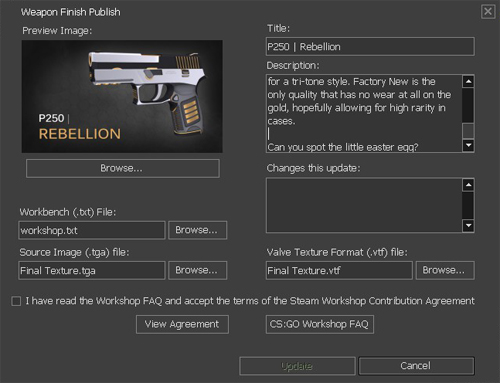
  4. Type workshop_publish.
  5. Weapon Finish should be selected by default. Click Add.
  6. For Preview Image, you can click Browse to select a promotional picture for your skin.
    Note: This shouldn't be an in-game screenshot. This should be a 'Render' - a promotional billboard style poster which is designed to hook people in. It can be whatever you want, aslong as it's within Valve's content laws etc. etc.
  7. For the workbench.txt file, click browse, and find the file that you saved earlier.
  8. The .vtf file will be pre-filled, but you may have to select the .TGA texture file of your final texture.
  9. Give the skin a catchy name and description, and click Submit.


Additional steps
The above steps will add the skin to the workshop, however I would highly recommend editting your workshop page further, and adding more screenshots. Try to add more screenshots: most people want to see a good eye-catching render, and also how it will appear when it is in game.

There are further steps necessary when submitting to the workshop, which unfortunately I cannot provide any guides for, as I have already done it! All I can remember is that you will need to agree to Steam's workshop Terms and Conditions, and also submit a USA Tax Form (even if you are not based in the USA). Bank details also need to be pre-filled on the off chance that your skin is chosen!
114 commenti
[UA/SK] Divine Lotus 1 lug 2019, ore 10:12 
For anyone that use GIMP (pasting my info to relative guides):

I recommend looking into the official Valve SDK Documentation for insight on how materials work in CSGO's Source engine, linked below:
GIMP alpha channel
https://developer.valvesoftware.com/wiki/GIMP

GIMP Alpha channel: https://m.youtube.com/watch?v=LQCziSTNJgQ
https://www.youtube.com/watch?v=A9aZdPqs17M

Using GIMP VTF plugin?
Be sure you're using GIMP 2.8.0

Not using it for GIMP? Follow this: https://developer.valvesoftware.com/wiki/Creating_a_Material

I have a wiki going on here that relates to the process of making skins / modding: https://node2.projectplanet.cn/@steamcommunity.com/sharedfiles/filedetails/?id=1501754039&searchtext=Wiki

Always try to read the manuals in anything, because they often give you insight and the proper foundation of how to handle things which most people don't care to look. They miss the good stuff
Адская Перчина 11 mag 2019, ore 14:36 
Hey. Awesome guide. BUT one question... UV Chart texture covers my own created texture in the WS Workbench. How can I fix that?
TheOneWhoKnocks 12 lug 2018, ore 9:41 
awesome, thank you :) I'm studying 3D animation, so I figured this could be an interesting way to make some extra money. But valve haven't given me much information on what my limitations are. So i figured I'd try here, but thank you for your help. I appreciate it.
Mcgubbins  [autore] 10 lug 2018, ore 9:05 
I honestly don't know if you can use other external programs. You can probably import the 3D model in some way, but it may be a lot of work. I have never tried it, so I don't know.

As for the normal maps, I personally haven't found any way to use custom ones, but, if I look at some other skins on the workshop, it looks like other people have made use of them. Interesting point of note... Valve doesn't allow you to upload custom normal maps, so even if it's possible, I'm not sure how you would even get it on to the workshop.
TheOneWhoKnocks 10 lug 2018, ore 7:01 
Do you know if we can make use of external programs such as substance painter/designer? If so, what other maps can we use along side it aside from the standard albedo map? Can we make use of normals, roughness and height maps? Thanks in advance :)
D€ÂƚΉ♤₵ђ€₳ƚ 15 mag 2018, ore 15:44 
Yea i put in a ticket the response was not our problem because it's a "Mod" issue?
The CS:GO submit uploader is overwriting the original file, how is that not a steam issue?:grin::steamsalty:
Mcgubbins  [autore] 15 mag 2018, ore 13:45 
i'm not too sure with that one, sorry. It sounds more like a steam bug than anything, so might be worth logging a ticket with the steam help. It definitely shouldn't overwrite anything
D€ÂƚΉ♤₵ђ€₳ƚ 15 mag 2018, ore 9:16 
Uploading "submit" new skin overwrites the previous submission
Submitting new skin overwrites the previous submission
Example: submitted P90 a week ago now submitting a new skin and the old skin gets
overwritten by the new one?
Any ideas?
Mcgubbins  [autore] 10 ott 2017, ore 14:16 
It's only necessary if you want to make a skin look worn in certain places. I think every skin uses it, but the more expensive skins are much less noticeable. you can leave it as a "near black" and it may be fine, depending on the skin.
Jo Wi 10 ott 2017, ore 11:40 
Hey, is it necesary to do the "alpha channel" thing? What's the difference, i tried it out in the workbench and it seems pretty fine to me : \